When StimTracker’s USB driver is installed, Windows will “see” a serial port device. This makes it possible to use StimTracker with any program capable of communicating with a serial port, including E-Prime.
This tech support note is in two parts: setting up E-Prime for communication with StimTracker, and how to send event markers via StimTracker. The screen snapshots were taken using E-Prime 2.0 and may look slightly different depending on the version you have.
Important: the instructions on this page assume that you have already installed the USB driver.
In E-Studio:
•
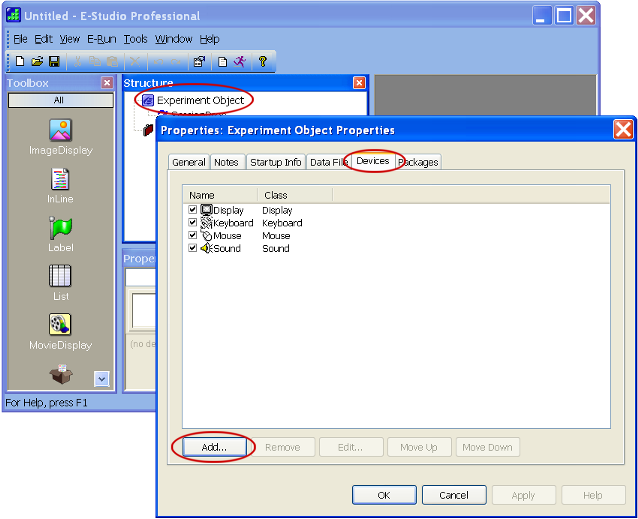
In the Structure window, double-click on Experiment Object; the Properties dialog (window) appears
•
Click on the Devices tab
•
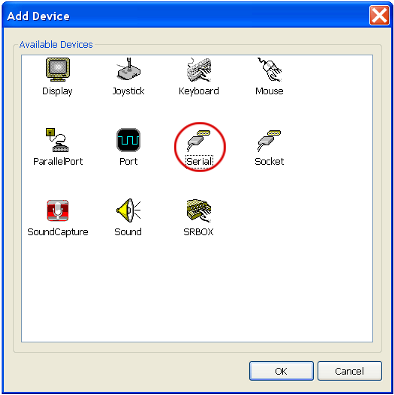
Click on the Add… button; the Add Devices dialog appears:
•
Double-click on Serial; this will add the Serial device and close the dialog
•
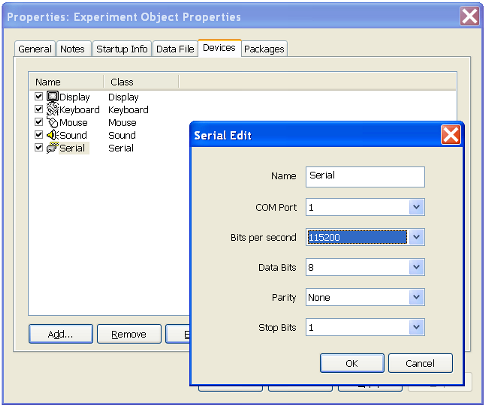
Back in the Properties dialog, double-click on “Serial” to edit its properties:
•
Change the “Bits per second” setting to 115200
•
Set “COM Port” to match what the USB driver has set the COM port number to. E-Prime 1.x will let you use only port numbers between 1 and 4. To find out what is StimTracker’s COM port number or to change it so that it’s between 1 and 4, click here.
•
[E-Prime 2.0 Only] It is tempting to rename the serial device from the default, generic “Serial” to something else, like “StimTracker”. If you do, then you must also change the function calls in E-Basic from Serial.WriteBytes and Serial.ReadBytes to StimTracker.WriteBytes and StimTracker.ReadBytes.
[E-Prime 2.0 Only] It is tempting to rename the serial device from the default, generic “Serial” to something else, like “StimTracker”. If you do, then you must also change the function calls in E-Basic from Serial.WriteBytes and Serial.ReadBytes to StimTracker.WriteBytes and StimTracker.ReadBytes.
•
Click on OK when done to close the Serial Edit dialog
•
Click on OK again to close the Properties dialog
This completes the basic setup. Serial port communication is now enabled within E-Prime.
Now it is just a matter of adding code to the task corresponding to the times that you would like E-Prime to have StimTracker put out an event marker. Before proceeding, please download the following file that contains a sample E-Prime experiment that was tested with E-Prime v2.0:
eprime_example [23KB]
In this example we will inform StimTracker of the onset of a stimulus display in each of the nine trials. Each event marker will communicate the value that is displayed on the monitor:
•
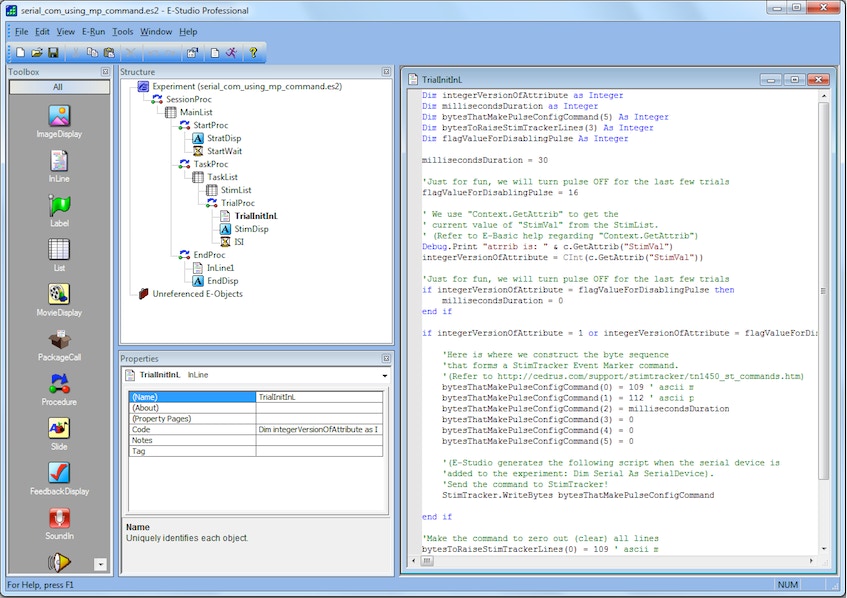
Add an InLine object to the TrialProc immediately preceding the “StimDisp” Text Display object
•
In this example, the InLine object that will send the serial communication is named “TrialInitInL”
•
Double-click on the “TrialInitInL” object and add the following code:
Dim integerVersionOfAttribute as Integer
Dim millisecondsDuration as Integer
Dim bytesThatMakePulseConfigCommand(5) as Integer
Dim bytesToRaiseStimTrackerLines(3) as Integer
Dim flagValueForDisablingPulse as Integer
millisecondsDuration = 30
‘ Just for fun, we will turn pulse OFF for the last few trials
flagValueForDisablingPulse = 16
‘ We use “Context.GetAttrib” to get the
‘ current value of “StimVal” from the StimList.
‘ (Refer to E-Basic help regarding “Context.GetAttrib”)
Debug.Print “atrrib is: “ & c.GetAttrib(“StimVal”)
integerVersionOfAttribute = CInt(c.GetAttrib(“StimVal”))
‘ Just for fun, we will turn pulse OFF for the last few trials
if integerVersionOfAttribute = flagValueForDisablingPulse then
millisecondsDuration = 0
end if
if integerVersionOfAttribute = 1 or integerVersionOfAttribute = flagValueForDisablingPulse then
‘ Here is where we construct the byte sequence
‘ that forms a StimTracker Event Marker command.
‘ (Refer to http://cedrus.com/support/stimtracker_1g/tn1450_st_commands.htm)
bytesThatMakePulseConfigCommand(0) = 109 ‘ ascii m
bytesThatMakePulseConfigCommand(1) = 112 ‘ ascii p
bytesThatMakePulseConfigCommand(2) = millisecondsDuration
bytesThatMakePulseConfigCommand(3) = 0
bytesThatMakePulseConfigCommand(4) = 0
bytesThatMakePulseConfigCommand(5) = 0
‘ (E-Studio generates the following script when the serial device is
‘ added to the experiment: Dim Serial As SerialDevice).
‘ Send the command to StimTracker!
Serial.WriteBytes bytesThatMakePulseConfigCommand
end if
‘ Make the command to zero out (clear) all lines
bytesToRaiseStimTrackerLines(0) = 109 ‘ ascii m
bytesToRaiseStimTrackerLines(1) = 104 ‘ ascii h
bytesToRaiseStimTrackerLines(2) = integerVersionOfAttribute
bytesToRaiseStimTrackerLines(3) = 0 ‘ currently ignored by StimTracker
Serial.WriteBytes bytesToRaiseStimTrackerLines
Move The Code to a Sub
Including the the code shown above every time you want to send a pulse can get tedious. You can move the code to an E-Basic sub and then just call the sub PulseStimTracker when you need to send a pulse:
‘ This function should be placed in the ‘User’ script area.
‘ View >> Script >> [choose 'User' tab]
Sub PulseStimTracker( lineSettings as Integer, millisecondsDuration as Integer )
Dim bytesThatMakePulseConfigCommand(5) as Integer
Dim bytesToRaiseStimTrackerLines(3) as Integer
‘ Here is where we construct the byte sequence
‘ that forms a StimTracker Event Marker command.
‘ (Refer to http://cedrus.com/support/stimtracker_1g/tn1450_st_commands.htm)
bytesThatMakePulseConfigCommand(0) = 109 ‘ ascii m
bytesThatMakePulseConfigCommand(1) = 112 ‘ ascii p
bytesThatMakePulseConfigCommand(2) = millisecondsDuration
bytesThatMakePulseConfigCommand(3) = 0
bytesThatMakePulseConfigCommand(4) = 0
bytesThatMakePulseConfigCommand(5) = 0
‘ (E-Studio generates the following script when the serial device is
‘ added to the experiment: Dim Serial As SerialDevice).
‘ Send the command to StimTracker!
Serial.WriteBytes bytesThatMakePulseConfigCommand
‘ Make the command to zero out (clear) all lines
bytesToRaiseStimTrackerLines(0) = 109 ‘ ascii m
bytesToRaiseStimTrackerLines(1) = 104 ‘ ascii h
bytesToRaiseStimTrackerLines(2) = lineSettings
bytesToRaiseStimTrackerLines(3) = 0 ‘ currently ignored by StimTracker
Serial.WriteBytes bytesToRaiseStimTrackerLines
End Sub
To copy code into the User Area of the script, select the User tab (located on the lower left corner of the Script editor window). Any code entered into this area is performed prior to the E-Studio compiled script at run time.
If the Script editing window is not visible in the E-Studio Workspace it can be accessed by checking View > Script from the E-Studio menu (or pressing Alt-5).
Error Handling
You will notice that while using the configuration described above, the task will crash at run time if you do not have your StimTracker device connected and powered on. The “one2nine_disp_srlcom_ErrHdl.es” task (included in the compressed folder you downloaded earlier) adds a set up option to enable/disable serial communication as well as some more advanced operations that manage error handling and allow the user to make adjustments at run time.
Timing
Because this method of communication involves sending the serial event marker and then initiating the actual stimulus event in E-Prime separately, it is possible that delays can be introduced between the serial event marker and the actual stimulus event. For in depth information regarding critical timing within E-Prime consult your E-Prime user’s guide.
The work on providing E-Prime support to StimTracker and much of the write up for this tech note are courtesy of James Desjardins, Technician and MA student in the Brock University Cognitive and Affective Neuroscience Lab.
Last revision: December 10, 2017
PRODUCTS
SUPPORT
STAY IN TOUCH
© Copyright 2024 Cedrus Corporation, P.O. Box 6309, San Pedro, CA 90734 - USA
Phone: +1-310-548-9595. Send us an email. See privacy policy.
qwerasdf